Sometimes, I know just what I want to bake. Sometimes, I just start searching through blogs and recipes until something grabs me by the ankles and begs to be baked. These muffins were like that.
I love fancy drinks from fancy coffee places. I love anything sweet, preferably covered in whipped cream. Now, I have to be honest, I haven’t ever ordered a caramel macchiato from anywhere, but muffins that involved caramel sauce, hot chocolate, and cream cheese had to be awesome. So, off I went. The first hurdle was trying to find caramel flavoured hot chocolate. I had never seen it anywhere, but I figured that some -had- to exist. Not only did I find some, but I found fancy-schmancy Nestle Dark Chocolate hot chocolate powder WITH caramel. Needless to say, I was in love, and it came home with me. (Side note: It makes a killer cup of hot chocolate, especially with some milk. Annnd it works great in these muffins.) I also had to wander the grocery store for a while trying to determine where they hid the caramel sauce. Considering it was still winter, ice cream related products (like caramel syrup) were playing a good game of hide and seek, but I was victorious, and ridiculously proud of myself. I am pretty sure sometimes the people at my grocery store hide things on me. Well, not really, but it feels that way sometimes!
So, home I went, ingredients in hand, and started to put together these muffins. They seemed like they had a lot of steps, but were soooo worth it. If you are a taster, like me (I have to make sure things are properly mixed. And of course, the best way to test that is to taste things,right? Right.), definitely make sure some of the cream cheese/caramel filling finds your mouth, it is very, very tasty. (I think I could eat a bowl of just that. That might just be my inner sweet loving bakergirl talking, but mmm, yummy.)
These turned out to be not super sweet (I suspect thats why you can get away with drizzling caramel sauce all over them!) and more cakey than muffiny, but I loved them. They go great with coffee or tea for breakfast!

Caramel Maccihato Cream Cheese Muffins (from Culinary Concoctions by Peabody, slightly edited)
½ cup unsalted butter, at room temperature
¾ cup granulated sugar
2 eggs
1 tsp vanilla extract
1 ½ tsp instant espresso powder
1/3 cup caramel flavoured hot chocolate
½ cup milk
2 cups all-purpose flour
2 tsp baking powder
¼ tsp salt
Caramel Cream Cheese Filling (recipe follows)
Preheat oven to 375F.
Grease either a jumbo (makes 6) or regular (makes 12) muffin tin.
In a small saucepan, heat the milk, but do not boil. Add the hot chocolate and the powdered espresso. Whisk and set aside. Don’t worry if it doesn’t all dissolve
Cream together on medium speed the sugar and butter until light and fluffy, about 3 minutes. (I just used a wooden spoon instead of a mixer, and it worked fine.)
Add eggs one at a time, scraping down the bowl after each addition.
Add the vanilla extract and espresso milk mixture, and beat for an additional minutes.
Sift together the flour, baking powder and salt in a large bowl. Add the butter mixture in the mixing bowl into the large bowl with the flour mixture.
Fold the mixture together just until combined. (do not over mix)
Divide the batter evenly among the muffin cups, filling each one about 2/3 of the way full.
Using a piping bag with large tip, fill the bag with cream cheese mixture. Place tip into the middle of the muffin and fill until you see the cream cheese on top. Repeat with all of the muffins.
Bake for 16-18 minutes (22-25 for the larger ones like I made). Insert a knife or wooden skewer to make sure they are done. Be sure to not insert the knife or skewer where the cream cheese is, that will give you a false reading of whether the muffin is done or not.
Let cool and drizzle with caramel if desired (I know, I know…you desire).
Caramel Cream Cheese Filling
4 ounces cream cheese, at room temperature
4 TBSP caramel sauce (I used the kind you drizzle over ice cream)
¼ cup brown sugar
1 egg
1 TBSP all-purpose flour
If using stand mixer, clean bowl. If using electric hand beaters, just get a new bowl. Beat the cream cheese and caramel together on medium-high for about 2 minutes. Until it is nice and smooth. Add sugar, egg, and flour and beat an additional 2 minutes.
It’s a Cake With a Hole In It!
Posted on: April 9, 2010
My mother loves going to thrift stores, and she passed that love on to me. When I mentioned that a bundt pan was on my list of “baking things I wanted to acquire someday just because”, she right away told me she always saw them at our local thrift store, and would be sure to pick one up for me when she was there next. Of course, now that she was going to the thrift store for a bundt pan, they had plenty of angel food cake pans, but no bundt pans.
A few days passed, and I sort of forgot about the mission to acquire a bundt pan. After all, there were plenty of other things I could bake! My mother eventually acquired a bundt pan for me, with pretty fluted sides. I had no idea how large it was (I later found out it was one of the larger sizes), but I decided to try baking something in it and see from there. I had also never had to grease and flour a pan before, but I am sure glad I looked up how to do it! My finished cake slid out like a dream. 🙂
I have an unnatural love for lemon cake. I have no idea why, but I love it. It just feels like springtime and happiness, in cake form. Considering it was winter when I made this cake, it was the perfect thing to brighten up a dreary winter’s day. I did learn one major thing, though. When you glaze the cake, MAKE SURE you put something underneath it. I didn’t. I glazed it while it was on the cooling rack, and, well, my counter was then covered in a nice layer of lemon syrup. While it smelled lovely, it was kinda messy, and not all that fun to clean up. Don’t be like me. Put a plate or a cloth or a baking tray under your cooling rack to catch the glaze!
Buttermilk Lemon Cake (from Tasty Kitchen, by RustownMom)
- ¾ cups Unsalted Butter
- 2 cups Sugar (divided Use)
- 3 whole Eggs
- 2-¼ cups All-purpose Flour
- ¼ teaspoons Salt
- ¼ teaspoons Baking Soda
- ¾ cups Buttermilk
- 1 whole Lemon (the Rind And The Juice, Divided Use)
Pre-heat oven to 350.
Cream butter and 1 1/2 cups sugar; beat in eggs.
Sift the dry ingredients and add to sugar/butter mixture, alternating with the buttermilk.
** If you don’t have some handy, you can make your own buttermilk with 3/4 cup milk and 1 scant tablespoon of vinegar. Let sit 15 minutes before using**
Grate the rind from the lemon into the batter mixture and add nuts if using, and stir. Pour batter into greased and floured Bundt cake or loaf pan.
Bake about 1 hour; check after 45 minutes to see if done. Cool 15 minutes while you mix the remaining 1/2 cup sugar with the juice from the lemon. Invert the cake on a plate and drizzle it with lemon syrup.
Adventures in Cheesecake
Posted on: March 6, 2010
Up until a few weeks ago, I had never made a cheesecake. They were things of legend in my mind, things that involved water baths and other esoteric things. I bought them frozen from the grocery store, or ate them in restaurants, but never made my own.
I had, on a couple of occasions, made what I know as “Mennonite cheesecake” (I suspect I call it that because it was served at every potluck I ever attended that was somehow involving the Mennonite church, or people who came from Mennonite background). It’s that unbaked cheesecake, the kind with a graham cracker crust, cream cheese and Dream Whip middle, with canned pie filling on top. It was tasty, and involved no scary things like water baths.
(I have no idea why the idea of baking something in a water bath seems to be the most complicated thing ever, for me. I just always associate it with super-fancy high class complicated dessert.)
But then, I got springform pans for Christmas. And what goes well in a springform pan? A lot of things, I discovered, but most especially, CHEESECAKE. So, my partner asked me to make a cheesecake.
I was, and still am, wary about making things with a water bath. But I reeeeeaaaaally wanted cheesecake. Thankfully, the recipe on the back of the Philadelphia cream cheese brick didn’t involve a water bath, so I decided that that would be my recipe! (Someday, I will brave a water bath while baking. Someday.) I did add some blueberries to it, though. I love fruit cheesecake! I also made my own blueberry pie filling to go on top.
So now, cheesecake is off my list of “Scary Things I Don’t Feel Confident Enough To Bake”! This is a very exciting thing.
Philadephia New York Cheesecake (from Kraft.ca, slightly edited)
Bake 1 hour 10 min. or until centre is almost set. Run knife or metal spatula around rim of pan to loosen cake; cool before removing rim of pan. Refrigerate 4 hours or overnight. (This is important. This makes the cheesecake set, and taste, well, like a cheesecake. I was impatient and tried it after about 45 minutes or so, and while tasty, was not as good until I let it sit. The more patient you are, the creamier and nicer the cheesecake.)
Blueberry Pie Filling (from Cooks.com) (I only used about half of this, but it freezes nicely for later!)
4 c. fresh or frozen blueberries
1 c. sugar
3 tbsp. cornstarch or 6 tbsp. flour
1/2 tsp. grated lemon peel
1/2 tsp. cinnamon
1/2 tsp. grated nutmeg
1 c. water
2 tbsp. lemon juice
Mix dry ingredients in saucepan.
Add water gradually. Bring to a boil, add blueberries and cook 3 or 4 minutes until clear and thickened, stirring constantly but carefully to prevent berries from crushing.
Remove from heat, add lemon juice.
Perfect Brownie Pan
Posted on: February 13, 2010
I have this odd love affair with things sold on TV. I often wish they worked as good as advertised, but they don’t. My mom likes to buy them, and try them, and we often end up disappointed. But…but…today! TODAY IT WAS NOT SO!
I caved and bought a “Perfect Brownie Pan” today. From Wal-Mart, but it’s the same one they sell on TV. It just looked so neat, and I figured that even if the whole “slicing” divider thing didnt work out, I would still have a new 9x13ish pan, and that is never a bad thing.
So, I brought it home (with a side trip to the grocery store for some ingredients to make the “Marbled Cheesecake Brownies” that were in the including recipe book), and set to work. I made the brownies (which start with a boxed mix, I used the Betty Crocker “Frosted” brownies, and just saved the frosting for use on some other baking project later), poured it in the pan, added hte cheesecake stuff, marbled it, and dropped the divider in. Then in it went into the oven, and I waited, hoping that it would work, but content to eat the brownies, regardless. I love brownies!
I pulled the pan out of the oven when the timer went off, waited a few minutes (you are supposed to cool the baking slightly before pulling the divider out, but get it out before things cool completely), and pulled the divider out, and pushed the sides of the pan down. (It’s built in such a way that you can put it on the stand thingy it comes with (yes, that is a technical term), and then push down the sides of the sides of the pan, freeing your baking), and was AMAZED.
It works. Exactly as it says it does.
It was hard not to do a “yay I didn’t waste 20 bucks on a stupid pan” dance in the kitchen. Instead, I waited until the brownies cooled and the cheesecake was ALMOST set (I couldn’t wait any longer, my tummy demanded brownie), and ate one in celebration.
FINALLY! As Seen On TV didn’t let me down!
Mm, Mm, Buttercream!
Posted on: September 8, 2009
Buttercream is about the easiest frosting to make. It’s nice and sweet, and it holds up well to being piped. I like Bakerella‘s buttercream recipe, because it is so very simple. 🙂
Bakerella’s Basic Buttercream:
1 cup (2 sticks) butter (room temperature)
1 teaspoon pure vanilla extract
1 1b. icing sugar (I didn’t end up using all of it, but you do use a lot.)
1-3 teaspoons milk, half and half or cream (I have used both milk and cream. The only real difference is the fat content, you get the same consistency of icing out of both.)
- Using a mixer, cream softened butter and vanilla until smooth.
- Add sugar gradually, allowing butter and sugar to cream together before adding more.
- If you want your frosting a little creamier, add a teaspoon of milk at a time and beat on high until you get the right texture. (This really varies on how thick you like your frosting.)
This recipe makes about enough for two batches of rainbow cupcakes, if you end up with 17-24, and don’t like heaps and heaps of frosting. The nice thing about buttercream is that it can be frozen, although you have to make sure you give it plenty of time to reach room temperature before piping with it again, or it will be all rough and grainy. You can also mix in a touch more milk, if you like.
Excuse me…
Posted on: September 8, 2009
But there’s a rainbow in my cupcake.
I have made these a few times now (once, I will admit, it was with a boxed mix. But only once.), and every time they are great fun.
I started with Joy the Baker’s Red Velvet cupcake recipe, because, well, you’re already adding food colouring, so it is only a few more short steps to make rainbow cupcakes. 🙂
Start by making the basic cupcake batter.
Joy the Baker’s Red Velvet Cupcakes, turned RAINBOW.
2 cups all-purpose flour
3 teaspoons baking powder
1/4 teaspoon salt
10 Tablespoons unsalted butter, softened
1 cup sugar
2 large eggs
1 teaspoon vanilla extract
1 cup milk
Food colouring in various colours (I used red, yellow, green, and blue. Your standard mix of food colours.)
Put a rack in the center of the oven and preheat oven to 350 degrees F. Line a muffin tin with cupcake liners and set aside.
Sift together flour, baking powder and salt into a bowl. Set aside.
Beat together butter and sugar in a large bowl with an electric mixer at medium-high speed until pale and fluffy, about 3 minutes. Beat in eggs one at a time, beating for 1 minute in between each addition. Beat in vanilla. Reduce speed to low and add flour mixture alternately with the milk in 3 batches, beginning and ending with the flour mixture and beating until just incorporated.
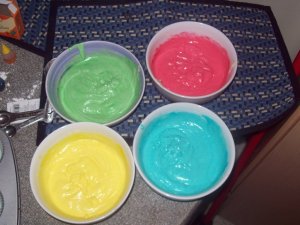
 (Now this is where the rainbow bit starts.) Now, take the batter and pour it into as many bowls as you want colours. Try to get the amounts as even as possible to ensure even-ish layers.
Then, spoon the batter in layers into your muffin cups. Fill them about 3/4 of the way full. (I overfilled mine, so I had monster-sized cupcakes. I also only ended up with 17. So less batter in each = smaller cupcakes, but there are more of them.)
Then, bake them like you would normal cupcakes. (In this case, bake at 350 for 15-18 minutes, or until the cakes a pick inserted in the center of the cakes comes out clean. Let cool for 10 minutes then remove cupcakes from muffin tin and let cool on a wire rack.)
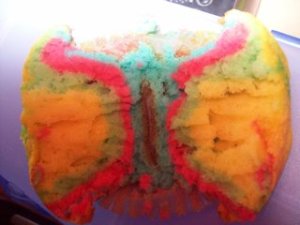
If you’re me, though, you get impatient, and pluck one out while they are still hot and break it open. It will look like this:

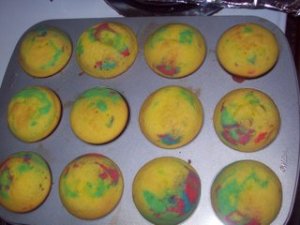
The whole pan will look quite pretty, like this:

Then you can frost and decorate them to your heart’s content. I like just a plain buttercream for this. The sweetness sets off the cupcakes nicely, and it is relatively easy to make. 🙂
Enjoy your cupcakes!

